RunwayML Multi-Speaker Lip Sync: Complete Guide
In this article, I’m going to walk you through how to use RunwayML’s multi-speaker lip sync feature, and also highlight areas where it could improve.
RunwayML tool allows you to synchronise multiple characters lips with dialogues, providing flexibility to switch between different character’s voices seamlessly. I’ll be explaining each step in detail, so by the end of this guide, you’ll know how to make the most of it.
Let’s dive right in!
What is RunwayML Multi-Speaker Lip Sync?
RunwayML now supports multi-character lip sync, allowing you to have several characters talk within the same scene. What’s exciting about this feature is that you can switch between characters seamlessly.
For example, one character can speak, followed by another, and then you can jump back to the first character if needed.
The possibilities for switching between different people, animated faces, or even faces with beards or unusual features are endless.
I’ll also show you how to make characters speak while in motion.
For a fun demonstration, I’m going to create a scenario where a couple watches TV, switching between various shows to highlight different styles and techniques.
Try Pika Art AI Lip Sync Feature
How to use Runway’s Multi-Speaker Lip Sync: Step By Step
Step 1: Logging In and Starting a New Project
Log in to RunwayML: Once logged in, go to the Lip Sync section under the video tools.

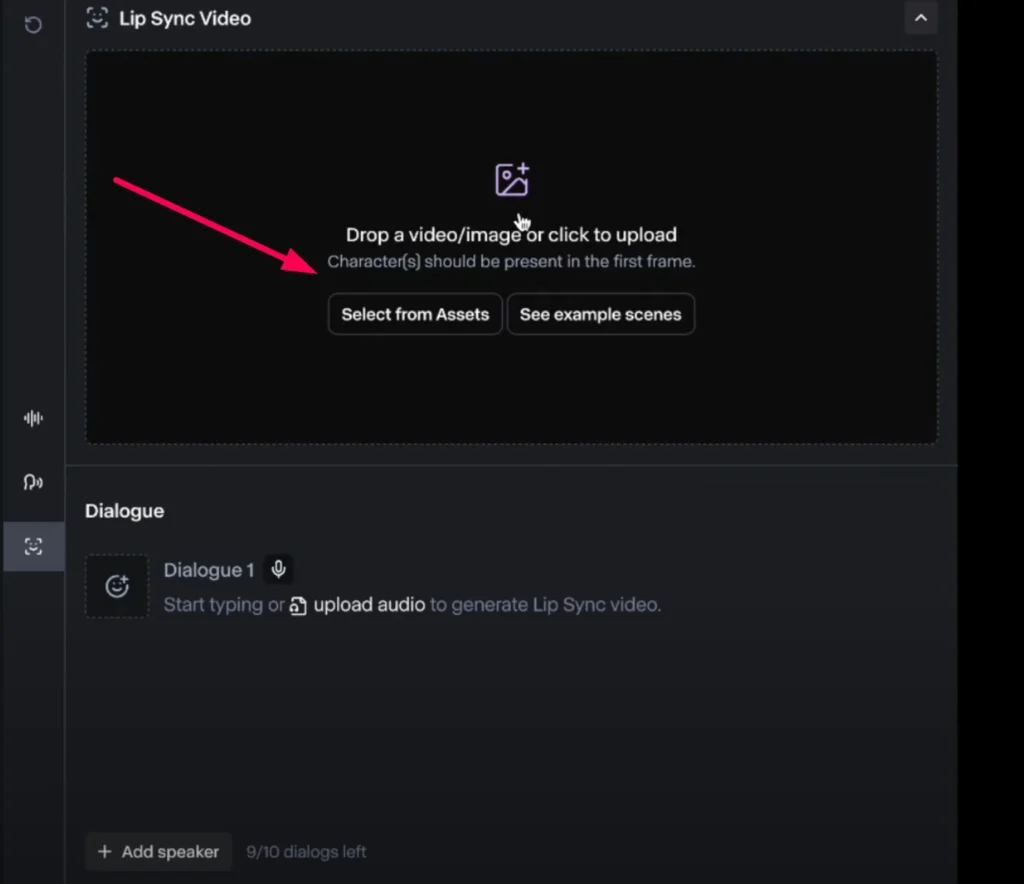
Upload an Image: Drop an image into the tool. RunwayML will scan the image for faces, identify each person, and make sure the content is appropriate according to their filters.
For example, in my project, the system identified two faces—Face 1 and Face 2—automatically.
Step 2: Adding Dialogues
Dialogue Assignment: Below the faces, there’s a dialogue section where you can input text. You can add up to 10 dialogues in a sequence.
To add dialogue, click on the microphone symbol and choose either a built-in voice or upload an audio file.
For this demonstration, I selected pre-built voices for my characters. It’s important to note that Dialogues 1 and 2 don’t necessarily mean they’re assigned to different characters—they simply represent the order in which the characters speak.
Character and Voice Assignment: After adding a dialogue, you can assign the text to any of the faces by selecting the appropriate character.

Example: I assigned Dialogue 1 to Character 1 and Dialogue 2 to Character 2. However, you could also assign multiple dialogues to the same character.
If you decide to remove a dialogue, the delete button is a bit tricky to find. To delete it, click on the dialogue and a delete button will appear next to it.
Step 3: Choosing Voices
Selecting Voices for Characters: RunwayML offers various built-in voices for your characters.
For example, I chose “Mirna” for Character 1 and “Frank” for Character 2.
Here’s something to keep in mind: RunwayML doesn’t automatically assign the voice to the same character in future dialogues. Each time you add a new line, you’ll have to reselect the voice manually.
Once the characters are set, input the dialogues. For example:
Mirna: “What should we watch tonight?”
Frank: “How about that show Trial by Jury?”
Re-selecting Voices: Since RunwayML doesn’t auto-assign voices, you’ll have to choose the correct voice for each character every time you add a new dialogue. Thankfully, the system remembers the two most recently used voices, which speeds things up a bit.
Step 4: Generating the Video
Generate the Video: Once all dialogues are entered and voices are assigned, click the Generate button. The tool will start rendering the scene, and the final result will show up in the output window.
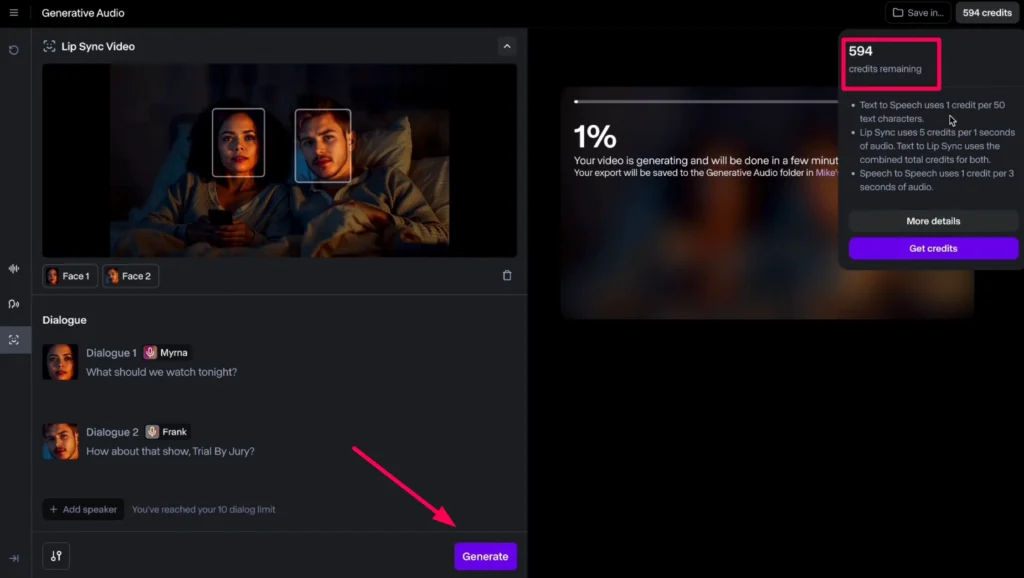
Cost Consideration: The Text-to-Speech (TTS) feature in RunwayML uses credits. One credit equals 50 text characters. However, the cost is relatively low compared to other tools available.
Step 5: Reviewing the Final Output
Video Quality: In this first test, the lip sync turned out to be more static than expected. The system primarily animates the face of the speaking character, but other subtle motions like blinking and nodding were also captured, which added to the realism.
I was pleasantly surprised by this—it wasn’t just a mechanical movement. The non-speaking character would blink or nod, adding to the believability of the scene.
Trying More Complex Setups
Faces in Profile
Next, I wanted to test the system with more complex setups, like faces in profile.
Profile View Test:
One of the most requested features for lip sync tools is the ability to work with faces in profile view. In real-life conversations, people often talk to each other rather than directly into the camera, so this is a natural setup to test.
Adding Dialogues:
I followed the same steps, assigning dialogue and voices to the characters. However, when I tried generating the scene, I encountered an error: “The faces turned too far to the side”.
Credits Refund:
RunwayML refunded the credits used for this attempt, which was a nice touch.
Switching to a Different Image:
I didn’t want to lose the dialogue and voices I had set up, so I replaced the image with one where the characters weren’t in profile. The system maintained all the assigned dialogues and voices, which saved me time. I simply had to adjust which face was assigned to which character.
Adding More Characters
After testing two characters, I wanted to push the system further by adding more faces.
Working with Group Photos: I uploaded a group photo containing seven people and attempted to assign dialogues to all of them.
The system successfully identified all seven faces but only allowed me to assign voices to four characters. This is something to keep in mind when working with larger groups.
Voice Assignment: Another limitation I encountered was the inability to link the face to a specific voice permanently. For example, I had to remember if Character 1 was assigned as “Jack” or “Frank,” since the system doesn’t maintain this automatically.
Generating the Scene: Despite these limitations, the four characters with dialogue had subtle reactions during the conversation, such as slight movements when others were speaking. However, the remaining three characters, who weren’t assigned dialogue, remained completely motionless.
Conclusion
The multi-speaker lip sync feature in RunwayML is an impressive tool that offers creative possibilities for animating characters. While there are a few limitations—such as the inability to handle profile views and the restriction of four speaking characters—it’s a solid option for creating engaging lip-sync videos. RunwayML adds subtle character movements that enhance realism, even in static scenes.
If you’re working on a project with multiple characters, this tool is worth exploring. Just remember to work within its current constraints and plan your scenes accordingly.
