Pika Art AI Review: Is Pika Art Worth It?
Welcome to my review of Pika Art, an AI-powered tool that turns your text into short videos. In this article, I’ll be giving you an overview, a demo of its features, and sharing my thoughts on whether it’s worth using for your video content needs.
Let’s dive right in.
What is Pika Art AI?
Pika Art allows you to take a piece of text and transform it into a short video. It’s particularly handy if you’re looking for a quick way to visualize stories or ideas. I’ll be walking you through a demo where we describe a story, and I’ll show you how the tool works using some examples from my own projects.
Creating Your First Video with Pika Art
Step 1: Describe Your Story
To kick things off, you simply input the description of the video you want to create.
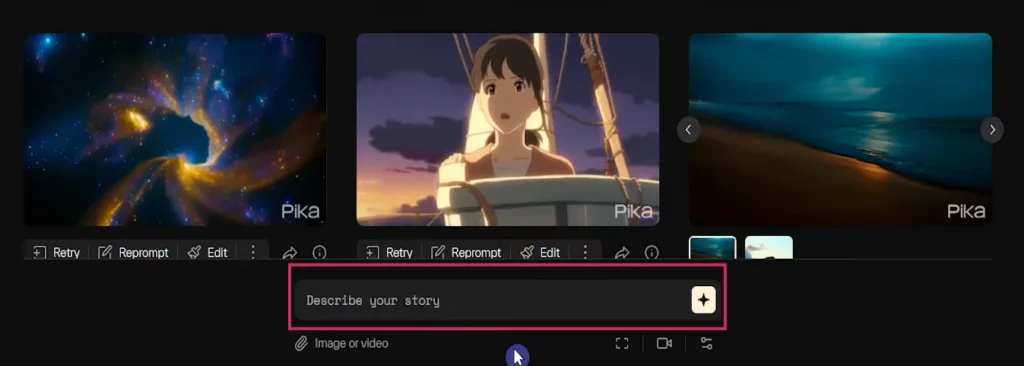
While that might sound wild, with AI, there are endless ways to bring creative concepts to life.
Step 2: Customize Video Settings
Before generating the video, you have some options:
- Video Aspect Ratio: Adjust this based on the platform where you’ll share the video (e.g., square for Instagram).
- Frames per Second (FPS): Set the FPS based on your preferences or project requirements.
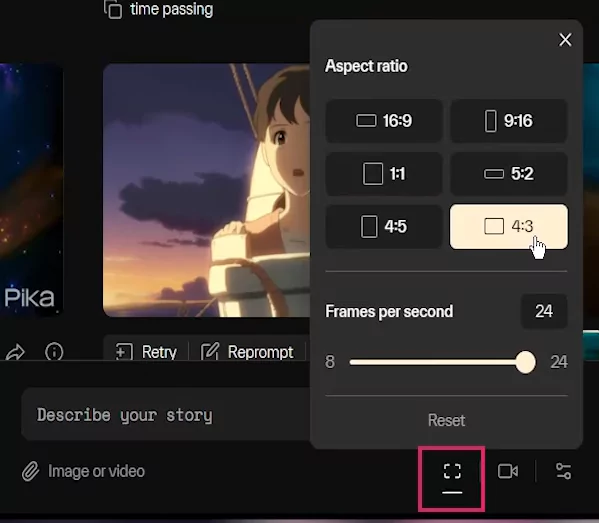
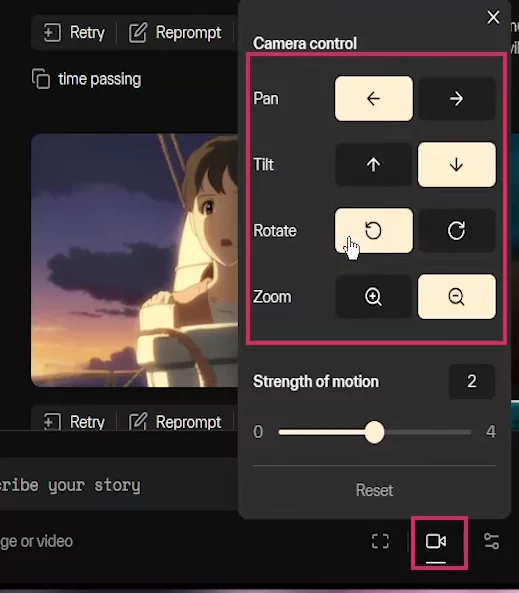
One cool feature is Camera Motion. You can choose to pan, tilt, rotate, or zoom. For this demo, I’ll be using the zoom option to show how it works.
Once you’re ready, hit the plus sign to start generating the video. The process takes about 30 seconds.
Reviewing the Results
Once the video is generated, I’ll walk you through the results.
You can zoom in on the video for more detail, and if you’re not satisfied, there’s always the option to retry and generate a new version.
Fine-tuning Your Video
Another feature that comes in handy is re-prompting. If you want to tweak your original input without starting from scratch, this option allows you to make adjustments and see how it affects the video output.
For example, let’s say I inputted “astronaut walking away, cinematic” — you could get different results depending on the input.
Sometimes the output might look cartoony instead of realistic, but that’s where fine-tuning your prompts really makes a difference.
Top 5 Features of Pika.Art
Here are the five most notable tools that stand out for transforming basic concepts into dynamic visual content:
1. Camera Controls in Pika.Art
Pika.Art offers extensive camera motion controls that allow users to simulate movements such as panning, zooming, and rotating. These controls help add depth and engagement to your video, creating a cinematic experience for your viewers.
2. Lip Sync Feature
One of the standout tools in Pika.Art is its lip sync feature. This feature enables characters in your video to speak naturally, aligning their lip movements with your audio.

Rather than relying on voiceovers, characters can now be the narrators themselves, which adds a more personal and connected feel to the video.
3. Expand Canvas for Social Media
The expand canvas tool is invaluable for creators looking to adjust the dimensions of their videos to fit different social media platforms. If you’re posting on Instagram, Facebook, or YouTube, this tool makes it easy to tailor your content for each platform’s specific layout.
4. Video Inpainting
With video inpainting, you can seamlessly edit elements within your videos, like altering clothing or adding intricate decorations.
This level of customization makes post-production adjustments much easier and is especially useful when refining your project.
5. Video Upscaling to 2K
Lastly, Pika.Art supports video upscaling to 2K resolution, enhancing the clarity and detail of your animations. If you’re working on a professional project or just trying to polish your content, this feature ensures your videos look sharp and professional.
Exploring Additional Features
Paid Plans
Pika Art also offers premium features in their paid plans, including:
- Upscaling: Increase the resolution of your video.
- Additional Seconds: Extend the length of your video if needed.
- Sharing Options: Directly copy links or share the video on your desired platform.
Prompt Examples
If you need inspiration, Pika Art offers prompt examples that you can modify.
For instance, I tried “astronaut sitting at a control board with blinking lights,” and the result was pretty good, though sometimes it doesn’t always match your vision exactly. But that’s the nature of AI—results can vary.
Addressing Common User Challenges of Pika Art
Though Pika.Art offers numerous benefits, there are also some challenges that users may face. From my experience, here are the top five issues that stood out.
1. Mandatory Slow Zoom
A frustrating limitation of Pika.Art is that every video render includes a slow zoom effect by default, and there’s no way to disable it.
This can be a significant hindrance when trying to create static visuals or more controlled video assets.
2. Bad Action Motion
Animating certain types of motion, like characters walking or vehicles moving, is extremely challenging with Pika.Art. In my experience, these animations often turned chaotic, particularly when using camera controls. This makes it difficult to achieve smooth and realistic action sequences.
3. Jittery Animations
One of the most glaring issues is how Pika.Art handles motion. Animations frequently appeared jittery and blurry, which detracted from the overall quality of the content.
This was especially problematic in scenes with minimal movement, making it harder to produce high-quality digital content.
4. Multiple Generations for Usable Renders
Getting a usable render in Pika.Art often requires multiple attempts, even for simple animations. This trial-and-error process can be time-consuming and frustrating, especially when you’re expecting efficient results from an AI-driven tool.
5. Pricing Model Concerns
The pricing model is another area that could be improved. Despite opting for what seemed like a reasonable $28 unlimited subscription, I quickly burned through my credits within the first day.
The platform frequently prompts you to purchase more credits, which can be frustrating when renders are often unusable.
Real-World Results: My Experience with Pika Art
I’ve tested various prompts and scenarios with Pika Art, and here are a few examples of the kinds of videos you can create:
Island Vacation
I love working with island themes, so I created a scene with a picture-perfect island. The sun was glowing, and the island rotated slightly to give the video a dynamic feel.
Another example was dark, stormy waves crashing against an island, which came out really well, creating a dramatic atmosphere.
From Images to Animated Clips
Pika Art doesn’t just work with text—you can upload images and turn them into short clips. I uploaded an image of a mermaid, and Pika Art animated the scene by zooming in and even adding fish swimming around.
The mermaid’s hair moved as if underwater, which added a nice touch.
However, I’ve noticed that sometimes the mouth movements in the videos can look a bit odd. For example, I generated a pirate, and the mouth seemed slightly out of sync. This is where the retry feature really comes in handy.
More Examples
Here are a few other videos I’ve created using Pika Art:
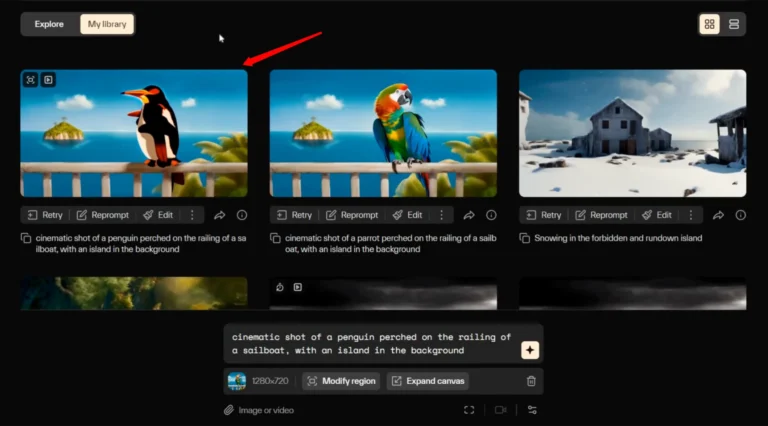
- Cinematic shot of a parrot perched on a sailboat with an island in the background.
- Tiger walking through the forest — although the tiger’s walk wasn’t perfect, the overall scene looked good.
- Zooming in on an uploaded image: This feature worked great for me. I uploaded a beautiful mermaid image, and Pika Art added some dynamic motion, such as birds flying and the mermaid playing an instrument.
Upscaling for Better Quality
If you want to improve the quality of your video, the upscale option can be useful.
I tested it on one of my creations, and the results were noticeable, even though I couldn’t compare it side-by-side with the original.
Top 5 Tips for Maximizing Pika.Art
To get the most out of Pika.Art, here are five tips based on my experience:
1. Modify Region Tool for Targeted Adjustments
The modify region tool allows for precise adjustments in areas of the video that didn’t render as expected. Instead of re-rendering the entire clip, this feature enables targeted corrections, saving time and resources.
2. Expand Canvas for Wide Shots
The expand canvas tool works great for creating wide shots without sacrificing quality. However, be careful not to over-expand too quickly, as this can drastically alter the composition of your video.
3. Use Guidance Scale
The guidance scale is crucial for controlling how closely the AI follows your input. Adjusting this can help strike the right balance between creative freedom and ensuring the AI sticks to your vision.
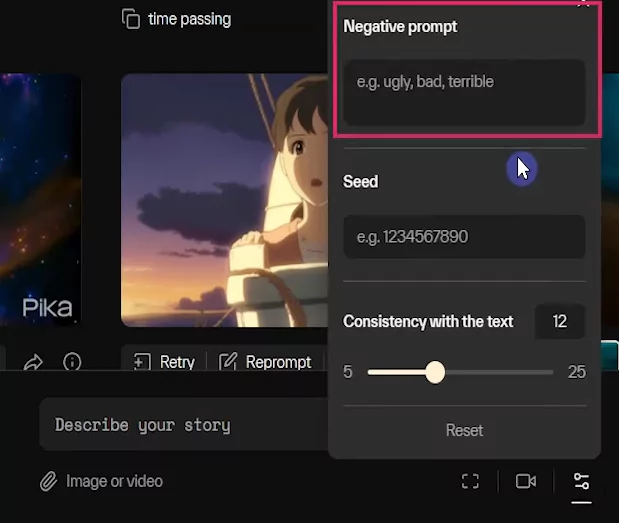
4. Use Negative Prompts to Refine Outputs
Negative prompts are helpful for removing unwanted elements from your animations. By refining the AI’s output, you can prevent irrelevant objects or actions from appearing in your video.
5. Use High-Quality Assets
Even though Pika.Art may degrade images during processing, starting with high-quality, cinematic images or video can improve the clarity of the final product.
This step will ensure your animations appear polished and professional.
Conclusion: Is Pika Art Worth It?
In conclusion, I would say that Pika Art is a promising tool that offers a unique way to transform text into videos. While it may not be perfect and requires a bit of fine-tuning, the potential is there. The quality of the final result largely depends on the input you provide, so be prepared to experiment with your prompts.
The good news is that Pika Art offers a free plan, so you can try it out and see how it fits your needs without any initial investment. For those willing to spend time mastering its features, it could become an invaluable tool for content creators, especially as video content continues to grow in popularity.
