Kling AI 1.5 Video Generator Update [New]
The latest update of the Kling AI Video Generator has dropped, and it’s nothing short of impressive. The realism is noticeably enhanced, and now users have the ability to control characters, elements, and objects in a scene with an unprecedented level of accuracy.
The precision is mind-blowing, and I’m thrilled to guide you through what’s new in this version, as well as how to take full advantage of it.
In this article, I’ll walk you through some of the key features of Kling AI, focusing on the updates introduced in version 1.5. We’ll go through each feature, and I’ll show you how to make the most of them while also pointing out a few common pitfalls to avoid.
Additionally, I’ve created a comprehensive prompt guide for using Kling AI. You can use this guide to follow along with the features I discuss in this article.
Kling 1.5 Overview: Key Features and Updates
1. Unbelievable Realism in AI Video
One of the most exciting aspects of Kling 1.5 is the realism that comes out of these AI models. The expressions on characters’ faces and even complex motions, like eating and dancing, are now incredibly lifelike.
If you’re familiar with the earlier versions, you’ll notice an immediate improvement in how the AI handles facial movements and gestures.
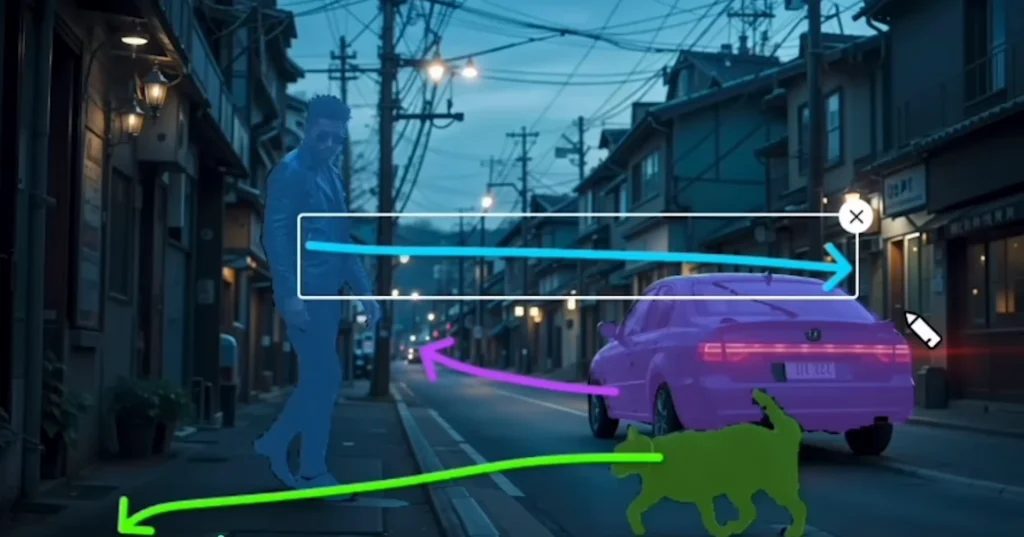
To give you an idea, I created a scene where I control a car, a man, and a dog, each moving independently. This level of control opens up endless possibilities for storytelling in your AI-generated videos.
2. New 1080p Resolution in Professional Mode
Kling 1.5 now supports full 1080p resolution in Professional Mode, enhancing the visual quality of your videos. The clarity and detail in each frame have been significantly upgraded, making your projects look more professional than ever before.
3. Motion Brush: Precise Control Over Movements
Kling 1.5 introduces a new Motion Brush feature, which gives you an incredible level of control over how elements move within a scene.
With the Motion Brush, you can dictate exactly how characters or objects move and interact, providing more flexibility in crafting narratives within your AI-generated videos.
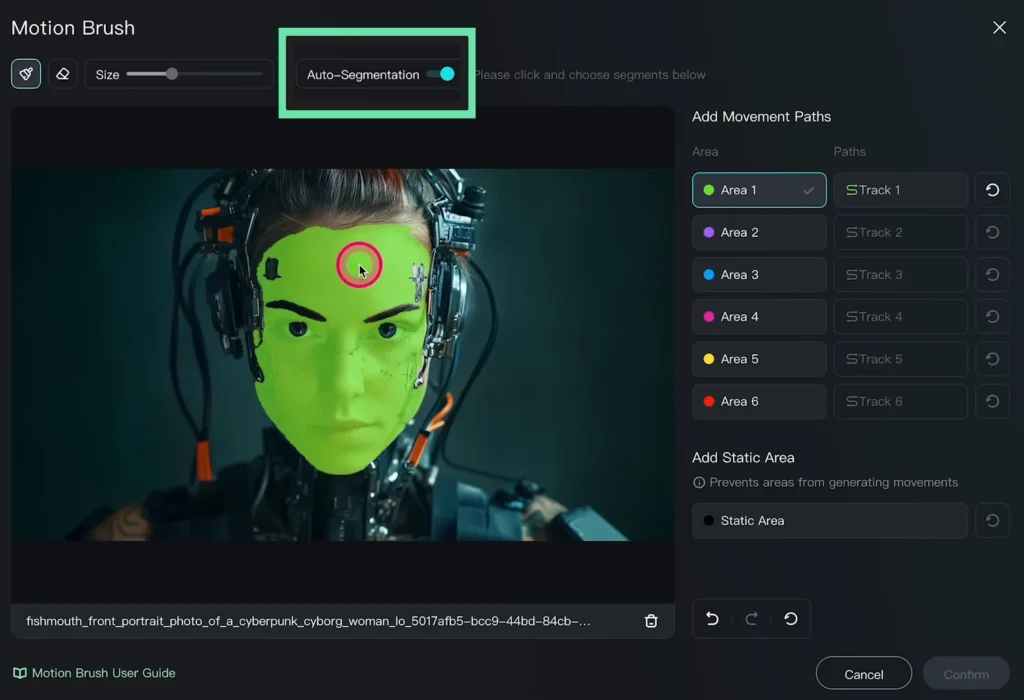
How the Motion Brush Works
- Selecting an Object: The first step is to choose an object in your video that you want to manipulate. You can select characters, animals, vehicles, or any other objects present in the scene.
- Drawing the Motion Path: Once selected, you draw the desired movement path. The Motion Brush allows you to precisely control the direction and speed of the object’s motion.
- Auto Segmentation: The AI intelligently segments elements in the scene, allowing you to move individual parts of an object or character without affecting the rest of the video.
For example, you can animate a car moving across the screen while the background remains static, creating a parallax effect that adds depth and realism to the shot.
4. End Frames: Total Control Over Scene Duration
Another valuable feature in Kling 1.5 is the addition of end frames. This feature allows you to define exactly where a video starts and ends, giving you control over the narrative arc of your scene. By setting start and end points, you can ensure that each video tells a complete story.
5. Extended Length for Image-to-Video Generations
One of the most requested features has been an increase in the length of AI-generated videos. Kling 1.5 delivers on that by allowing users to create videos that are up to 10 seconds long, and possibly longer depending on the complexity of the scene. This extension provides more room for creativity, as you’re no longer limited to short clips.
6. Expanded Prompt Window for Greater Detail
Kling 1.5 also includes an expanded prompt window, allowing you to input more detailed descriptions when generating videos. This means you can specify intricate details in your prompt, which gives you more control over how the video turns out.
Example: Using a Green Screen for Background Changes
In one of my projects, I used Kling’s image-to-video feature and added a green screen background. This allowed me to swap out the background with a more suitable one later in post-production. The nuanced micro-expressions on the character’s face, and even subtle details like how her hair moves with slight head movements, were incredibly realistic.
Comparing this to Kling 1.0, you’ll notice a significant improvement in character movement and camera dynamics. While the older version had a slightly jittery feel, Kling 1.5 delivers a smoother, more natural result.
Kling AI Key Updates:
- Increased Video Quality: Kling AI 1.5 is now available in 1080p resolution using the professional mode.
- Motion Brush Feature: This new tool allows for precise control over movements, enabling users to dictate character and object actions in shots.
- End Frames: The ability to define start and end frames enhances directorial control, allowing you to dictate the narrative of your shots.
- Extended Clip Length: Users can now create clips longer than 10 seconds, enhancing storytelling possibilities.
- Longer Prompt Window: The prompt window now accommodates more detailed prompts, granting users greater creative control.
Community Contributions: Realism in Action
The realism achieved by Kling AI users is awe-inspiring, and I’d like to showcase some incredible examples from the community.
Eating Motions: A Tough Challenge for AI
Eating is one of the most challenging actions for AI to replicate because it requires an understanding of how to hold different types of food, how food interacts with the mouth, and how it’s consumed. In Kling 1.5, however, the AI handles these complex motions impressively well.
For example, in a video shared by Opener AI, a woman is seen eating a piece of chicken. The AI accurately captures her chewing motions, and even the portion of food removed from the chicken is realistic.
Comparing this to earlier AI attempts—where eating motions were awkward and unnatural—you can see how far the technology has come.
Another example showcases a woman eating noodles. The AI captures her movements as she sucks in the noodles, and her head motions are incredibly lifelike, giving the scene a very natural feel.
Sci-Fi Scenes: Handling Complex Materials
User-generated content also highlights the AI’s ability to handle complex environments. One impressive example comes from a sci-fi scene where a soldier’s visor reflects light realistically, while dust particles interact naturally with the environment. The AI understands how different materials behave under various lighting and environmental conditions, resulting in stunning realism.
Human Expressions: Improved Consistency
One of the more difficult aspects for AI to get right has always been human expressions, especially with the consistency of facial features. Teeth and hands are two areas where earlier versions of AI models often struggled. However, in Kling 1.5, we’re seeing much better results, with consistent dental features and more natural hand movements.
For example, a video from AIfreak_tool shows a woman whose mouth movements and teeth remain consistent throughout her performance, a marked improvement over previous iterations where teeth would change shape or size between frames.
Using Kling AI: Step-by-Step Guide to Motion Brush
Step 1: Create an Account
To get started, visit KlingAI.com and create an account. This process is straightforward and will grant you access to all the new features.
Step 2: Choose Your Model
Upon logging in, select the model you want to use. Currently, there are two options: Kling 1.0 and Kling 1.5. For most new features, including the Motion Brush, it’s best to choose Kling 1.0 until Motion Brush is integrated into Kling 1.5.
Step 3: Select Your Image
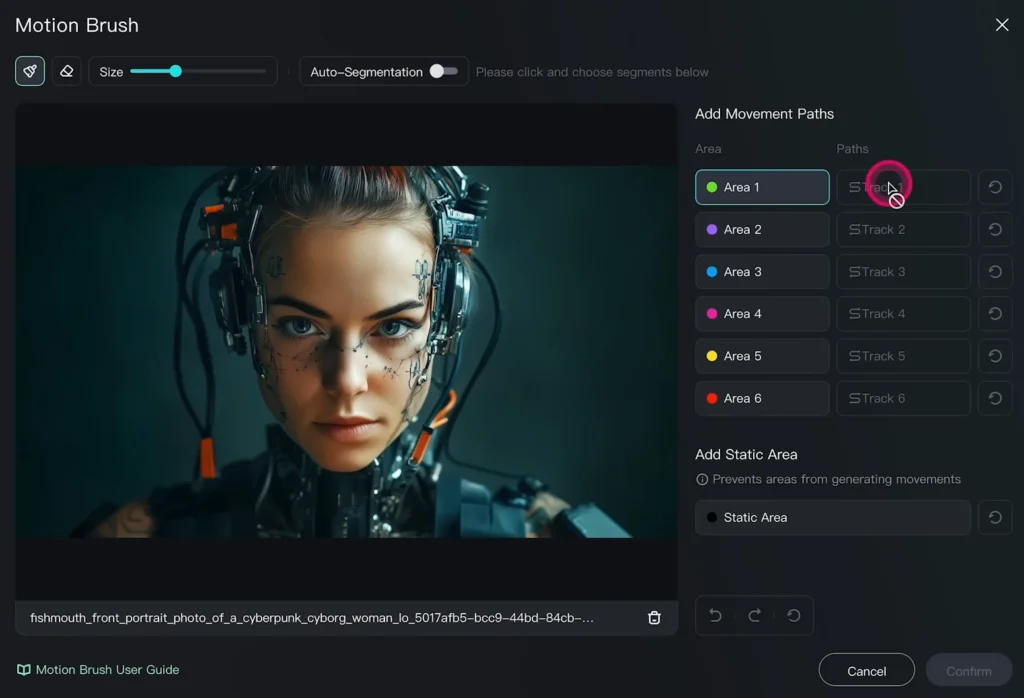
Begin by uploading an image you want to work with. For instance, if you have a cyborg woman image from MidJourney, you can upload it and prepare to draw the desired movements.
Step 4: Use the Motion Brush
- Click on the area that says “Click, Drop, Paste” to upload your image.
- Select Draw Motions to begin defining the motion area.
- Use the auto-segmentation feature to allow the AI to identify different elements in the image.
- Once you’ve selected the desired elements, draw the movement path for each object or character.
- Confirm the movement once you’re satisfied with the arrangement.
Step 5: Implement Negative Prompts
Kling AI 1.5 now supports negative prompts, which allow you to specify elements you want to exclude from your video. This feature is particularly useful for refining results.
- Paste your negative prompt into the designated box.
- Press generate to see the output without the specified elements.
Step 6: Generate Multiple Videos
One of the standout features of Kling AI 1.5 is the ability to generate up to four videos simultaneously. This functionality can be utilized by repeating the steps above for different scenarios or characters.
Tips for Maximizing Motion Brush Control
Motion Brush allows users to have greater control over how elements move within a video, enabling precise adjustments to make animations smoother and more dynamic.
Some key strategies for mastering Motion Brush include:
- Experiment with Timing: Adjusting the timing of movements can dramatically improve the natural flow of animated objects. Slower transitions may appear more fluid, while faster ones add energy.
- Layering Motions: Applying different layers of movement to multiple objects creates more depth and complexity in your animations.
- Practice with Curves: Tweaking the curves of the motion paths allows for fine-tuning the easing in and out of animations, giving users more nuanced control over object behavior.
Using Kling 1.5: Crafting Effective Prompts
One of the standout features in this release is the improved ability to craft effective prompts. The tool now offers:
1. Advanced Natural Language Processing (NLP):
Kling AI can now interpret more detailed prompts, making it easier to get accurate, creative results.
2. Customizable Responses:
Users can adjust how Kling AI responds to different scenarios, allowing for more tailored outputs.
3. Prompt Optimization Tips:
To get the best results, focus on concise yet descriptive inputs that highlight the main elements you want the AI to generate.
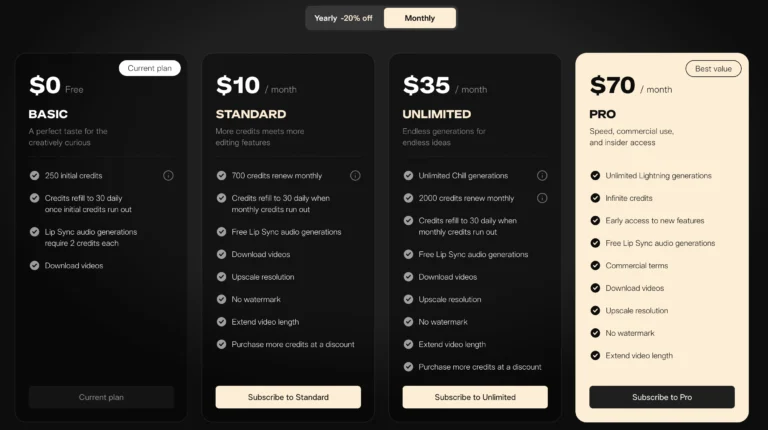
Kling AI Pricing and Subscription Information
Kling AI offers several subscription tiers to cater to different types of users, from hobbyists to professionals. These tiers include:
| Plan | Description |
|---|---|
| Free Tier | Access to basic features and limited functionality. Ideal for those just exploring Kling AI. |
| Pro Plan | Includes advanced features such as enhanced brush controls, more customization options, and priority customer support. |
| Enterprise Plan | Designed for businesses, offering full access to all tools, collaborative features, and dedicated support for larger teams. |
Conclusion
As I wrap up this exploration of Kling AI Video 1.5, I am genuinely excited about the potential it holds for creators. The advancements in realism, control, and the introduction of the Motion Brush feature mark a significant step forward in AI video generation.
