Pika Inflate Effect
Today, I’m excited to walk you through one of my favorite effects available in Pika Art AI the Inflate Effect. If you’re looking for a way to make objects or characters in your visuals appear larger or more exaggerated, this effect is perfect. In this guide, I’ll cover everything from what the effect is, how it works, and how you can use it to enhance your creations.
What is the Pika Inflate Effect?
The Inflate Effect is exactly what it sounds like it allows you to blow up specific parts of your image or video, giving it a cartoonish, balloon-like appearance.
This effect is super fun and can be used creatively to exaggerate certain elements in a visual, whether you’re working on animations, illustrations, or even video edits. It gives you that playful, over-the-top visual boost.
How to Apply the Inflate Effect in Pika Art?
Using the Inflate Effect is pretty straightforward, and the tool is intuitive enough for both beginners and experienced users alike. Here’s a quick rundown of how you can get started:
- Open Pika Art
If you already have an account, simply log in to the Pika Art platform. If not, you’ll need to sign up first. - Upload Your Image or Video
Once you’re in, upload the image or video that you want to work with. Pika supports multiple file formats, so most media types are accepted. - Select the Inflate Effect
Navigate to the effects section and find the Inflate Effect. Once selected, you can choose the areas of your image or video that you want to inflate. - Adjust the Size
The cool part about this effect is how flexible it is. You can control how much you want to inflate specific areas. You can tweak the settings to inflate as much or as little as you need. - Preview the Changes
Before you finalize anything, always make sure to preview the effect to ensure it looks the way you want. This is your chance to make adjustments until it’s perfect. - Save and Export
Once you’re happy with your inflated creation, simply save your file and export it in your desired format.
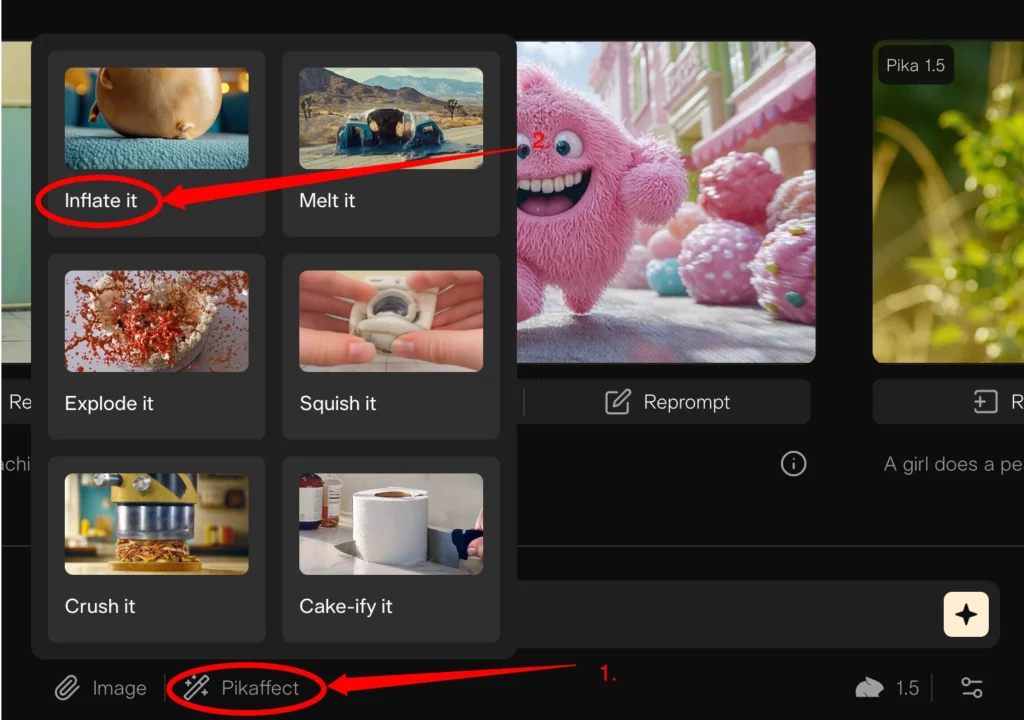
Available Pikaffects:
Best Use Cases for the Inflate Effect
The Inflate Effect can be used in tons of creative ways. Here are a few ideas to get your creativity flowing:
1. Animated Videos:
Adding a touch of humor to your animations by inflating characters’ features can make them more engaging and fun.
2. Social Media Content:
This effect is great for eye-catching posts. Inflated objects or people grab attention, making your content stand out in feeds.
3. Marketing and Promotions:
Use the Inflate Effect to emphasize certain elements in your promotional visuals, like blowing up text or product images to make them pop.
Tips for Getting the Best Results
Don’t Overdo It: While it’s tempting to go all-out, inflating too much can make your visuals look unnatural or cluttered. Try to find a balance that enhances your creation without overwhelming it.
Focus on Key Elements: Choose parts of your image or video that you really want to stand out. This will keep the effect purposeful and visually impactful.
Experiment with Different Sizes: Play around with how much you inflate different elements. Sometimes a subtle inflate can be just as effective as a dramatic one.
Conclusion:
The Inflate Effect is a fun, easy-to-use tool that can bring a lot of life to your visuals. If you’re creating for business, social media, or just for fun, this effect lets you add a playful, exaggerated twist to your content.
Let me know how you use the Inflate Effect in your projects.
