Pika Art AI Animation Video Tutorial
In this article, I’m excited to show you how to create animation AI videos using Pika Labs. There have been some incredible innovations with the tool, and the results we’re getting are kind of borderline cinematic.
Step 1: Create a Cinematic Image
The first step to get a cinematic result is to input a cinematic image. For images, I like to use MidJourney because I feel it produces the best results at this point.
Tips for Creating Cinematic Images in MidJourney:
Input a Cinematic Still: Type in a cinematic still, specify the composition, and detail what you want to see in your frame.
Lens and Resolution: Mention the lens type (32mm, 8K, etc.) and discuss the color grading to push your image in a cinematic direction.
Open in Browser: Always open the image in the browser to get the highest resolution.
Once you have your cinematic image ready, save it and move on to the next step.
Step 2: Convert the Image to Video in Pika Art
Pika Labs operates inside Discord. If you haven’t joined the Pika Discord server, make sure to do so. Here’s a step-by-step guide to convert your image into a video using Pika Labs.
Uploading Your Image
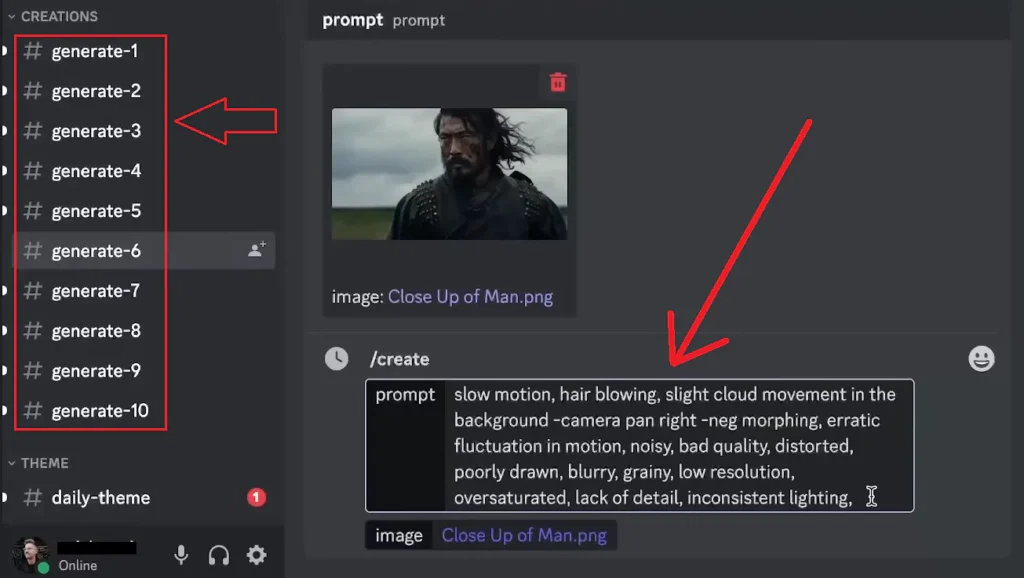
- Go to Generate Channels: Navigate to any generate channel in Pika Labs.
- Type Command: Type
/createto begin the process. - Upload Image: Click the plus sign to upload your image. Drag and drop your image into the window.

For our example, I’m using an image of a man looking to the left with his hair blowing in the breeze.
Input Your Prompts
Describe the Action:
For this image, type in “slow motion,” “hair blowing,” and “slight cloud movement in the background.”
Frame Rate:
By default, Pika Labs uses 24 frames per second, which is standard for films. No need to change this unless you have specific requirements.
Camera Movements:
You can direct camera movements by typing commands like -camera pan right, pan left, pan up, pan down, and combinations like pan right and up.
Negative Prompts:
To ensure maximum quality, add a negative prompt using -neg and input tags like “noisy,” “bad quality,” and “distorted” to remove unwanted elements.
Render the Video
When ready, hit enter to render the video. The process takes about 30 seconds.
Step 3: Review and Refine the Video
After Pika Labs processes the video, review the results. If you’re not satisfied, you can:
- Refresh: Click the refresh wheel to run the prompt again.
- Edit Prompts: Use the shuffle button to change your prompts and resubmit.
If you like the video, download it to your computer.
Pika Art: Cinematic AI Video Tutorial
Step 4: Remove Watermark (Optional)
Pika Labs videos come with a watermark. To remove it, use Wondershare PixCut:
Upload Video: Drag and drop your footage into PixCut.
Brush Over Watermark: Use the brush tool to cover the Pika Labs watermark.
Remove Objects: Click “remove objects” to process the video.
Note that this tool may not be perfect every time, but it’s effective for most needs.
Step 5: Enhance Video Quality with Topaz Video AI
To achieve maximum cinematic quality, I recommend using Topaz Video AI.
Here’s how to do it:
Upload Footage:
Drag and drop your video into Topaz Video AI.

Adjust Output Settings:
- Set resolution higher than your target export (e.g., export in 4K if working on an HD project).
- Ensure frame rate is set to 24 FPS.
- Choose AI Model: Select the Proteus model, which provides the best results.
- Output Settings: Choose ProRes 422 for maximum resolution or h.264 high quality if storage is an issue.
Export the Video
When you’re ready, hit the export button and let Topaz Video AI process the footage.
Final Review
Let’s preview the final result. The video should look incredibly cinematic with clear details in the hair, clothing texture, and realistic bokeh in the background.
While there are always areas for improvement, the results are quite impressive given the tools’ capabilities.
Conclusion
That’s how you achieve maximum cinematic quality using Pika Art. Experiment with different camera movements, motion settings, and prompts to find the best results for each shot.
